


R Markdown is a reproducible authoring format supporting dozens of static and dynamic output formats. Let's review why and how you should containerize Rmd files.
The rmarkdown package is behind the versatility of R Markdown with dozens of standard and community-provided output formats, ranging from HTML, Word, and PDF, to slides, books, and interactive documents. This abundance of awesomeness is a direct continuation of a long line of predecessors: Sweave/LaTeX, knitr, and pandoc. Its success is the foundation upon which Quarto is built on.
The htmlwidgets R package provides the basis for interactive JavaScript widgets that you can embed in HTML outputs. These are pre-rendered objects that respond to various gestures, like hover and click events. You just render the document once, and you are done until the next time when the document needs updating.
True reactivity, however, requires a lot more JavaScript heavy-lifting – i.e. using Observable – or you can use Shiny as the runtime for the R Markdown document. Such documents require a web server to watch for reactive updates in the background. This makes them effectively Shiny apps.
As with any type of Shiny app, a lot of the hosting options out there require the Shiny app to run inside of a Docker container (e.g. Heroku, ShinyProxy, Fly). Because interactive R Markdown documents differ from Shiny apps in subtle ways, serving them is also slightly different. In this post, we review how to "dockerize" R Markdown documents with different runtime environments.
Prerequisites
We will use the script from the analythium/rmarkdown-docker-examples GitHub repository.
 analythium
You can also pull the following two Docker images:
docker pull eddelbuettel/r2u:20.04
docker pull nginx:alpine
Runtime: Shiny
The way to make R Markdown document interactive/reactive is to add runtime: shiny to the document’s YAML header. Now you can add Shiny widgets and Shiny render functions to the file’s R code chunks. This way the rendered HTML document will include reactive components.
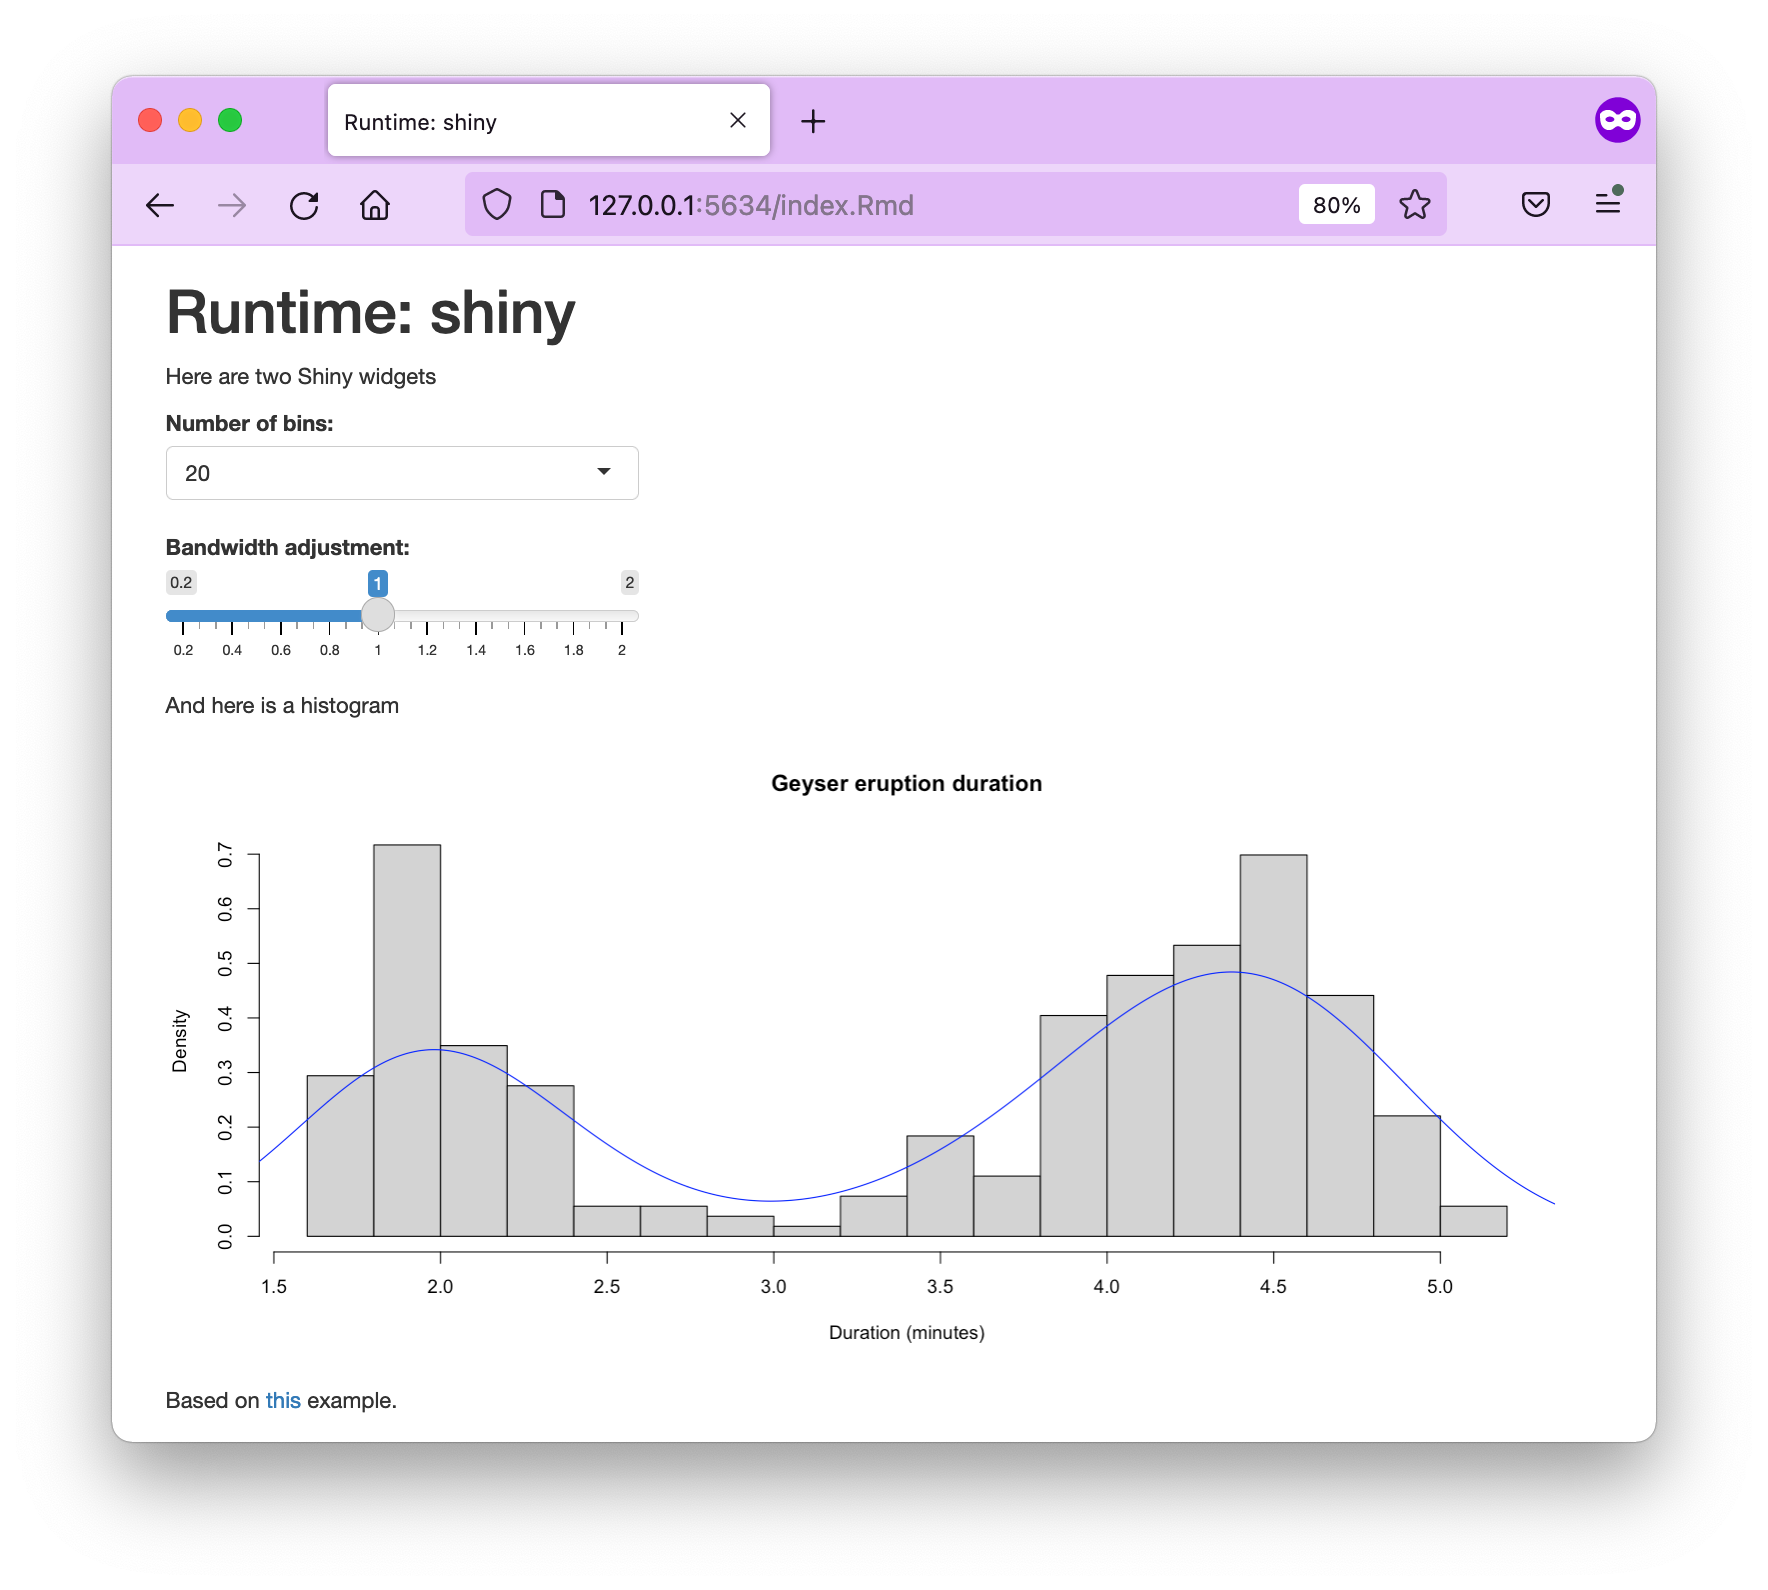
Here is the runtime-shiny/index.Rmd file as our first document (following this example):
---
title: "Runtime: shiny"
output: html_document
runtime: shiny
---

Here are two Shiny widgets

```{r echo = FALSE}
selectInput("n_breaks",
  label = "Number of bins:",
  choices = c(10, 20, 35, 50),
  selected = 20)
sliderInput("bw_adjust",
  label = "Bandwidth adjustment:",
  min = 0.2,
  max = 2,
  value = 1,
  step = 0.2)
```

And here is a histogram

```{r echo = FALSE}
renderPlot({
  hist(faithful$eruptions,
    probability = TRUE,
    breaks = as.numeric(input$n_breaks),
    xlab = "Duration (minutes)",
    main = "Geyser eruption duration")
  dens <- density(faithful$eruptions,
    adjust = input$bw_adjust)
  lines(dens,
    col = "blue")
})
```
You should use rmarkdown::run() instead of rmarkdown::render("index.Rmd") to get the Shiny app running that will look like this:
We will use the following Dockerfile:
FROM eddelbuettel/r2u:20.04

RUN apt-get update && apt-get install -y --no-install-recommends \
    pandoc \
    && rm -rf /var/lib/apt/lists/*

RUN install.r shiny rmarkdown

RUN addgroup --system app && adduser --system --ingroup app app
WORKDIR /home/app
COPY runtime-shiny .
RUN chown app:app -R /home/app
USER app

EXPOSE 3838

CMD ["R", "-e", "rmarkdown::run(shiny_args = list(port = 3838, host = '0.0.0.0'))"]
Here is the explanation for each line:
- the
eddelbuettel/r2uparent image represents one of the most significant improvements in developer experience in the past few years, it cuts Docker build times to seconds due to full dependency resolution and using Ubuntu'saptpackage manager (read more about it here) - we need a newer version of
pandocthan the standard package for the fancy R Markdown features we are using - install R packages
- add a user named
appand create a/home/appfolder for this user - copy the contents of the
runtime-shinyfolder into the/home/appfolder - set file permissions and set the
appuser the user of the container - expose port 3838
- define the command using
rmarkdown::run()and making sure Shiny runs on the port that we expect it
You can build and run the image:
docker build -f Dockerfile.shiny -t psolymos/rmd:shiny .

docker run -p 8080:3838 psolymos/rmd:shiny
Visit localhost:8080 to see the R Markdown document running as a Shiny app.
However, because it requires a full document render for each end user browser session it can perform poorly for documents that don’t render quickly.
Runtime: Shinyrmd
Prerendered Shiny documents represent an improvement. The Shiny runtime can perform poorly for documents that don’t render quickly. This is where runtime: shinyrmd (or its alias, runtime: shiny_prerendered) comes in. Such documents are pre-rendered before deployment so that the HTML loads faster. No need to wait for Shiny to render it for us.
The Shinyrmd runtime also comes with various contexts: server-start/setup/data (that is analogous to global.R), render (like the UI), and server. These contexts provide a hybrid model of execution, where some code is run once when the document is pre-rendered and some code is run every type the user interacts with the document.
The runtime-shinyrmd folder contains another Rmd file (based on this flexdashboard example):
---
title: "Runtime: shinyrmd"
output: flexdashboard::flex_dashboard
runtime: shinyrmd
---

```{r setup, include=FALSE}
library(dplyr)
knitr::opts_chunk$set(echo = FALSE)
```

```{r data, include=FALSE}
faithful_data <- sample_n(faithful, 100)
```

Column {.sidebar}
--------------------------------------------

```{r}
selectInput("n_breaks",
  label = "Number of bins:",
  choices = c(10, 20, 35, 50),
  selected = 20)
sliderInput("bw_adjust",
  label = "Bandwidth adjustment:",
  min = 0.2,
  max = 2,
  value = 1,
  step = 0.2)
```

Based on [this](...) example.

Column
--------------------------------------------

### Geyser Eruption Duration

```{r}
plotOutput("eruptions")
```

```{r, context="server"}
output$eruptions <- renderPlot({
  hist(faithful_data$eruptions,
    probability = TRUE,
    breaks = as.numeric(input$n_breaks),
    xlab = "Duration (minutes)",
    main = "Geyser Eruption Duration")
  dens <- density(faithful_data$eruptions,
    adjust = input$bw_adjust)
  lines(dens,
    col = "blue")
})
```
You can render and run with rmarkdown::run():
The Dockerfile is slightly modified from the Shiny runtime:
- we need 2 more dependencies
- we need to pre-render the document with
rmarkdown::render()so that it is there when we spin up the container
FROM eddelbuettel/r2u:20.04

RUN apt-get update && apt-get install -y --no-install-recommends \
    pandoc \
    && rm -rf /var/lib/apt/lists/*

RUN install.r shiny rmarkdown flexdashboard dplyr

RUN addgroup --system app && adduser --system --ingroup app app
WORKDIR /home/app
COPY runtime-shinyrmd .
RUN R -e "rmarkdown::render('index.Rmd')"
ENV RMARKDOWN_RUN_PRERENDER=0
RUN chown app:app -R /home/app
USER app

EXPOSE 3838

CMD ["R", "-e", "rmarkdown::run(shiny_args = list(port = 3838, host = '0.0.0.0'))"]
Build and run:
docker build -f Dockerfile.shinyrmd -t psolymos/rmd:shinyrmd .

docker run -p 8080:3838 psolymos/rmd:shinyrmd
Visit localhost:8080 to see the R Markdown document running as a pre-rendered Shiny app.
The docker build is super fast, thanks to the r2u image we used. The image size is around 1 GB, a bit larger than the ~800 GB parent image.
index.Rmd. To avoid this, we can include the ENV RMARKDOWN_RUN_PRERENDER=0 environment variable after the render() command.Interactive tutorials with learnr
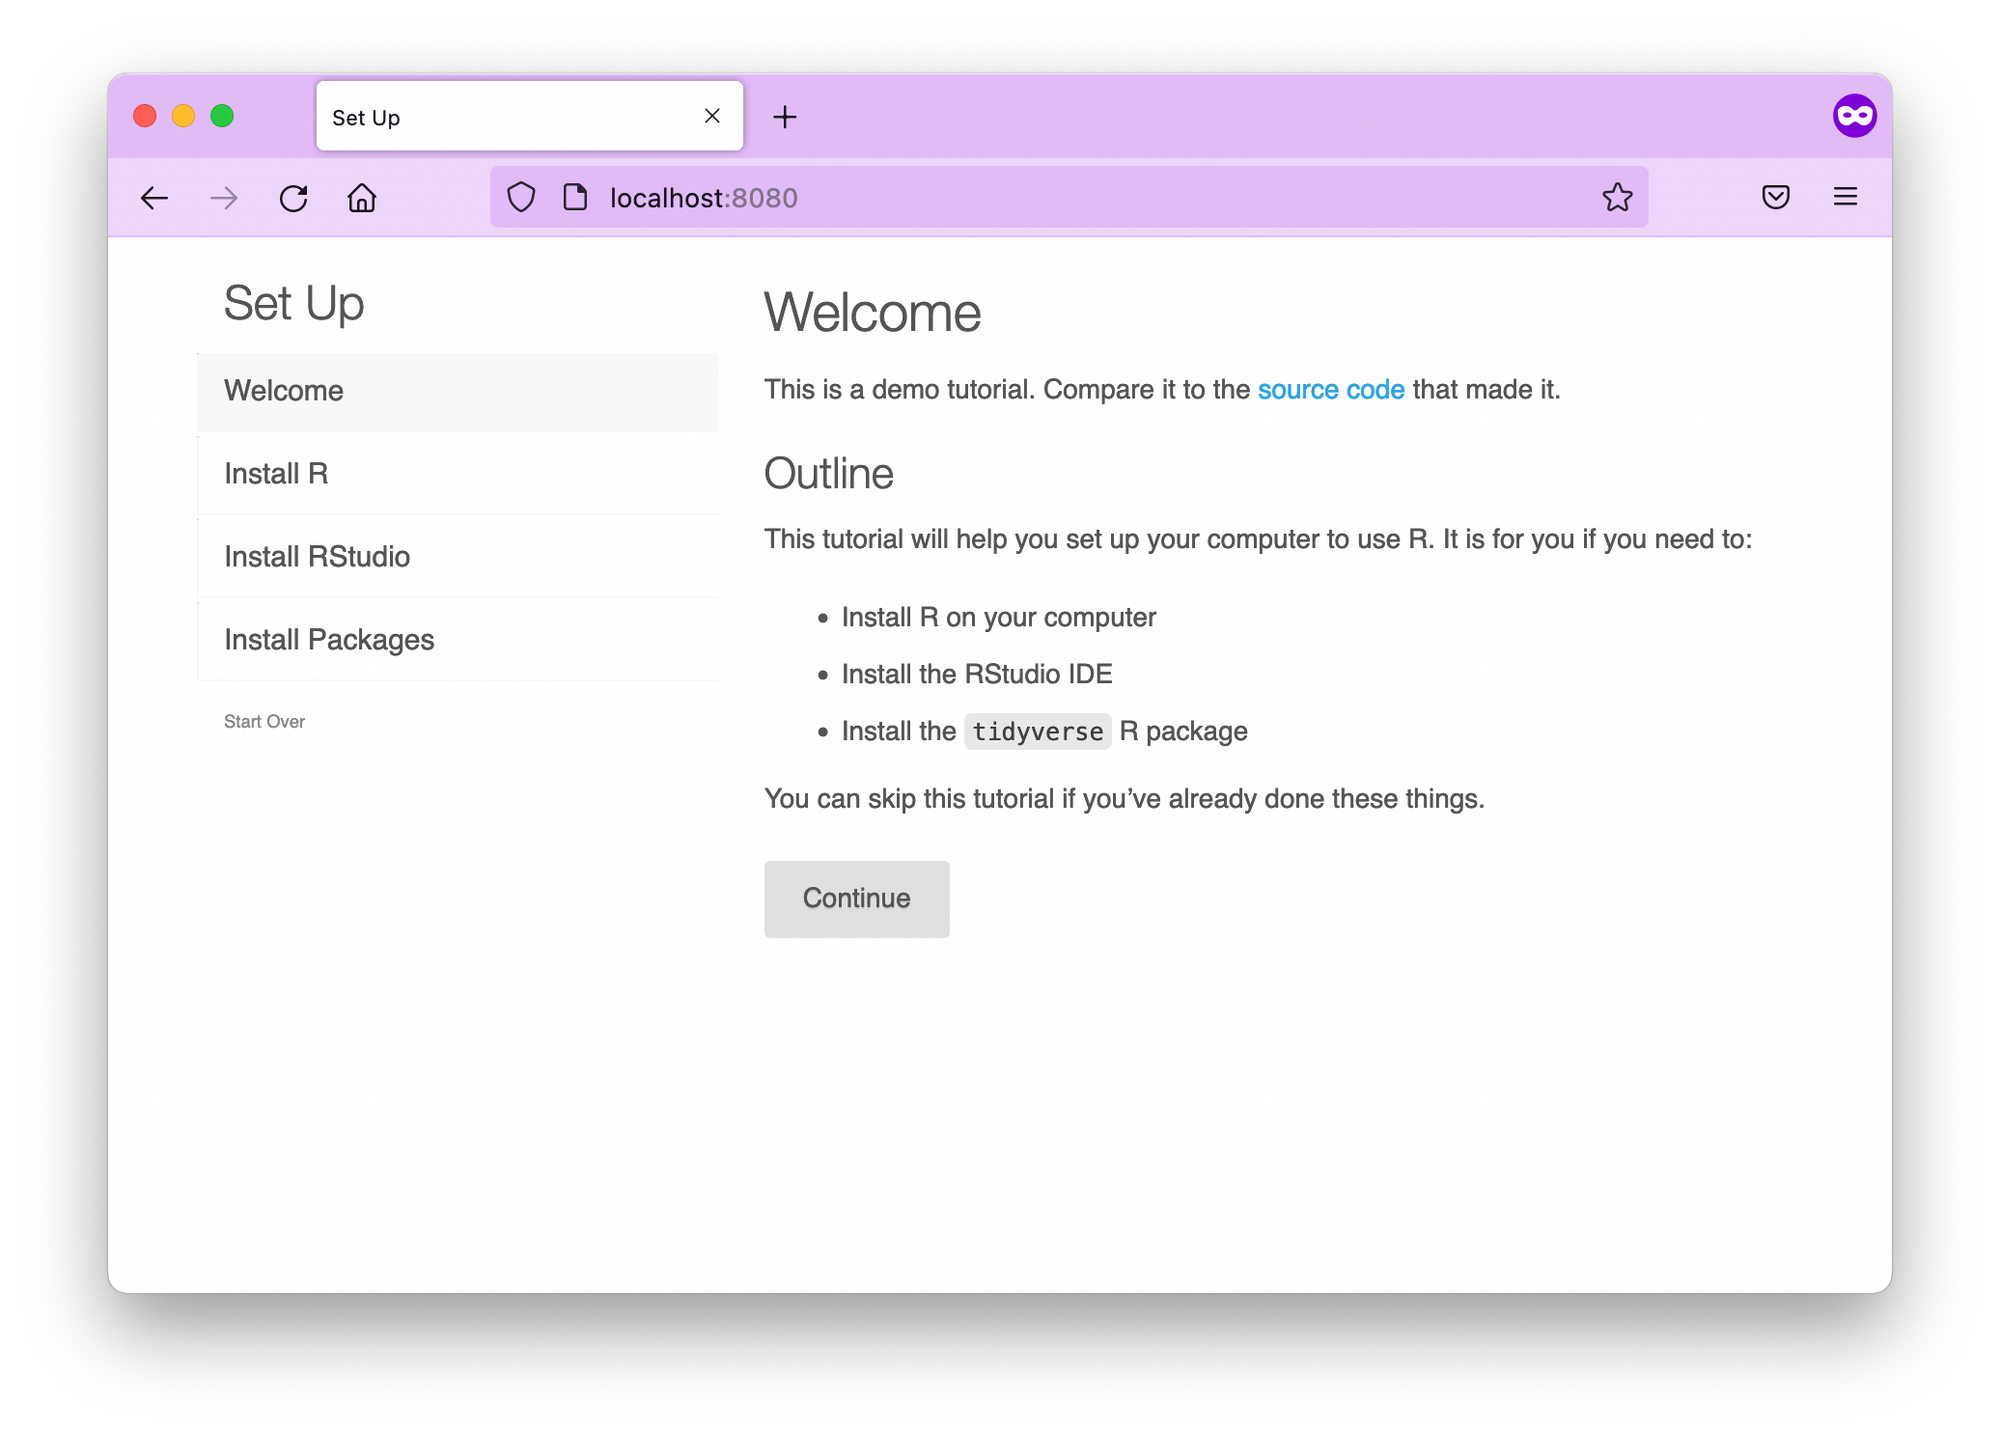
The learnr R package is for creating interactive tutorials using R Markdown. This also uses the prerendered Shiny runtime. Let's see an example using this learnr tutorial (follow the link to the whole file, showing only the YAML header and a few more lines here):
---
title: "Set Up"
output:
  learnr::tutorial:
    progressive: true
    allow_skip: true
runtime: shiny_prerendered
description: >
  Learn how to set up R and RStudio on your machine. We will also demonstrate
  how to install R packages from CRAN, and install the tidyverse package.
---

```{r setup, include=FALSE}
library(learnr)
tutorial_options(exercise.timelimit = 60)
```

## Welcome

This is a demo tutorial. Compare it to the [source code](https://github.com/rstudio/learnr/tree/main/inst/tutorials/ex-setup-r/ex-setup-r.Rmd) that made it.

[...]
And the corresponding Dockerfile that is very similar to the previous example, using the RMARKDOWN_RUN_PRERENDER environment variable to make sure render is not happening at runtime:
FROM eddelbuettel/r2u:20.04

RUN apt-get update && apt-get install -y --no-install-recommends \
    pandoc \
    && rm -rf /var/lib/apt/lists/*

RUN install.r shiny rmarkdown learnr

RUN addgroup --system app && adduser --system --ingroup app app
WORKDIR /home/app
COPY learnr .
RUN R -e "rmarkdown::render('index.Rmd')"
ENV RMARKDOWN_RUN_PRERENDER=0
RUN chown app:app -R /home/app
USER app

EXPOSE 3838

CMD ["R", "-e", "rmarkdown::run(shiny_args = list(port = 3838, host = '0.0.0.0'))"]
Build and run the example:
docker build -f Dockerfile.learnr -t psolymos/rmd:learnr .

docker run -p 8080:3838 psolymos/rmd:learnr
Runtime: Static
Static runtime, as its name implies, creates a static document. It stays the same until some of the document's inputs (images, data) change and the document is re-rendered. This gives us an easy way to just locally render the HTML document, copy it into a Docker image, then serve it using Nginx using this Dockerfile:
FROM nginx:alpine
COPY runtime-static/index.html /usr/share/nginx/html/index.html
CMD ["nginx", "-g", "daemon off;"]
This creates a tiny image (30 MB). Run the container and forward the port 80 where Nginx serves the static files to see the result.
What if you want to take advantage of a Docker-based build environment? You might experience issues with some of the dependencies on certain operating systems, or your IT department might not allow you to install packages yourself but you can use Docker ... Or what if you just want to complicate something that should be simple?
This brings us to a neat Docker build feature called multi-stage builds. We know that our Ubuntu-based image is quite big, so we only want to use that to render the HTML. Once it is done, we just insert that artifact into a small Alpine Linux image.
Multi-stage build with Nginx
With multi-stage builds, you use multiple FROM statements in your Dockerfile. You can selectively copy artifacts from one stage to another, leaving behind everything you don’t want in the final image.
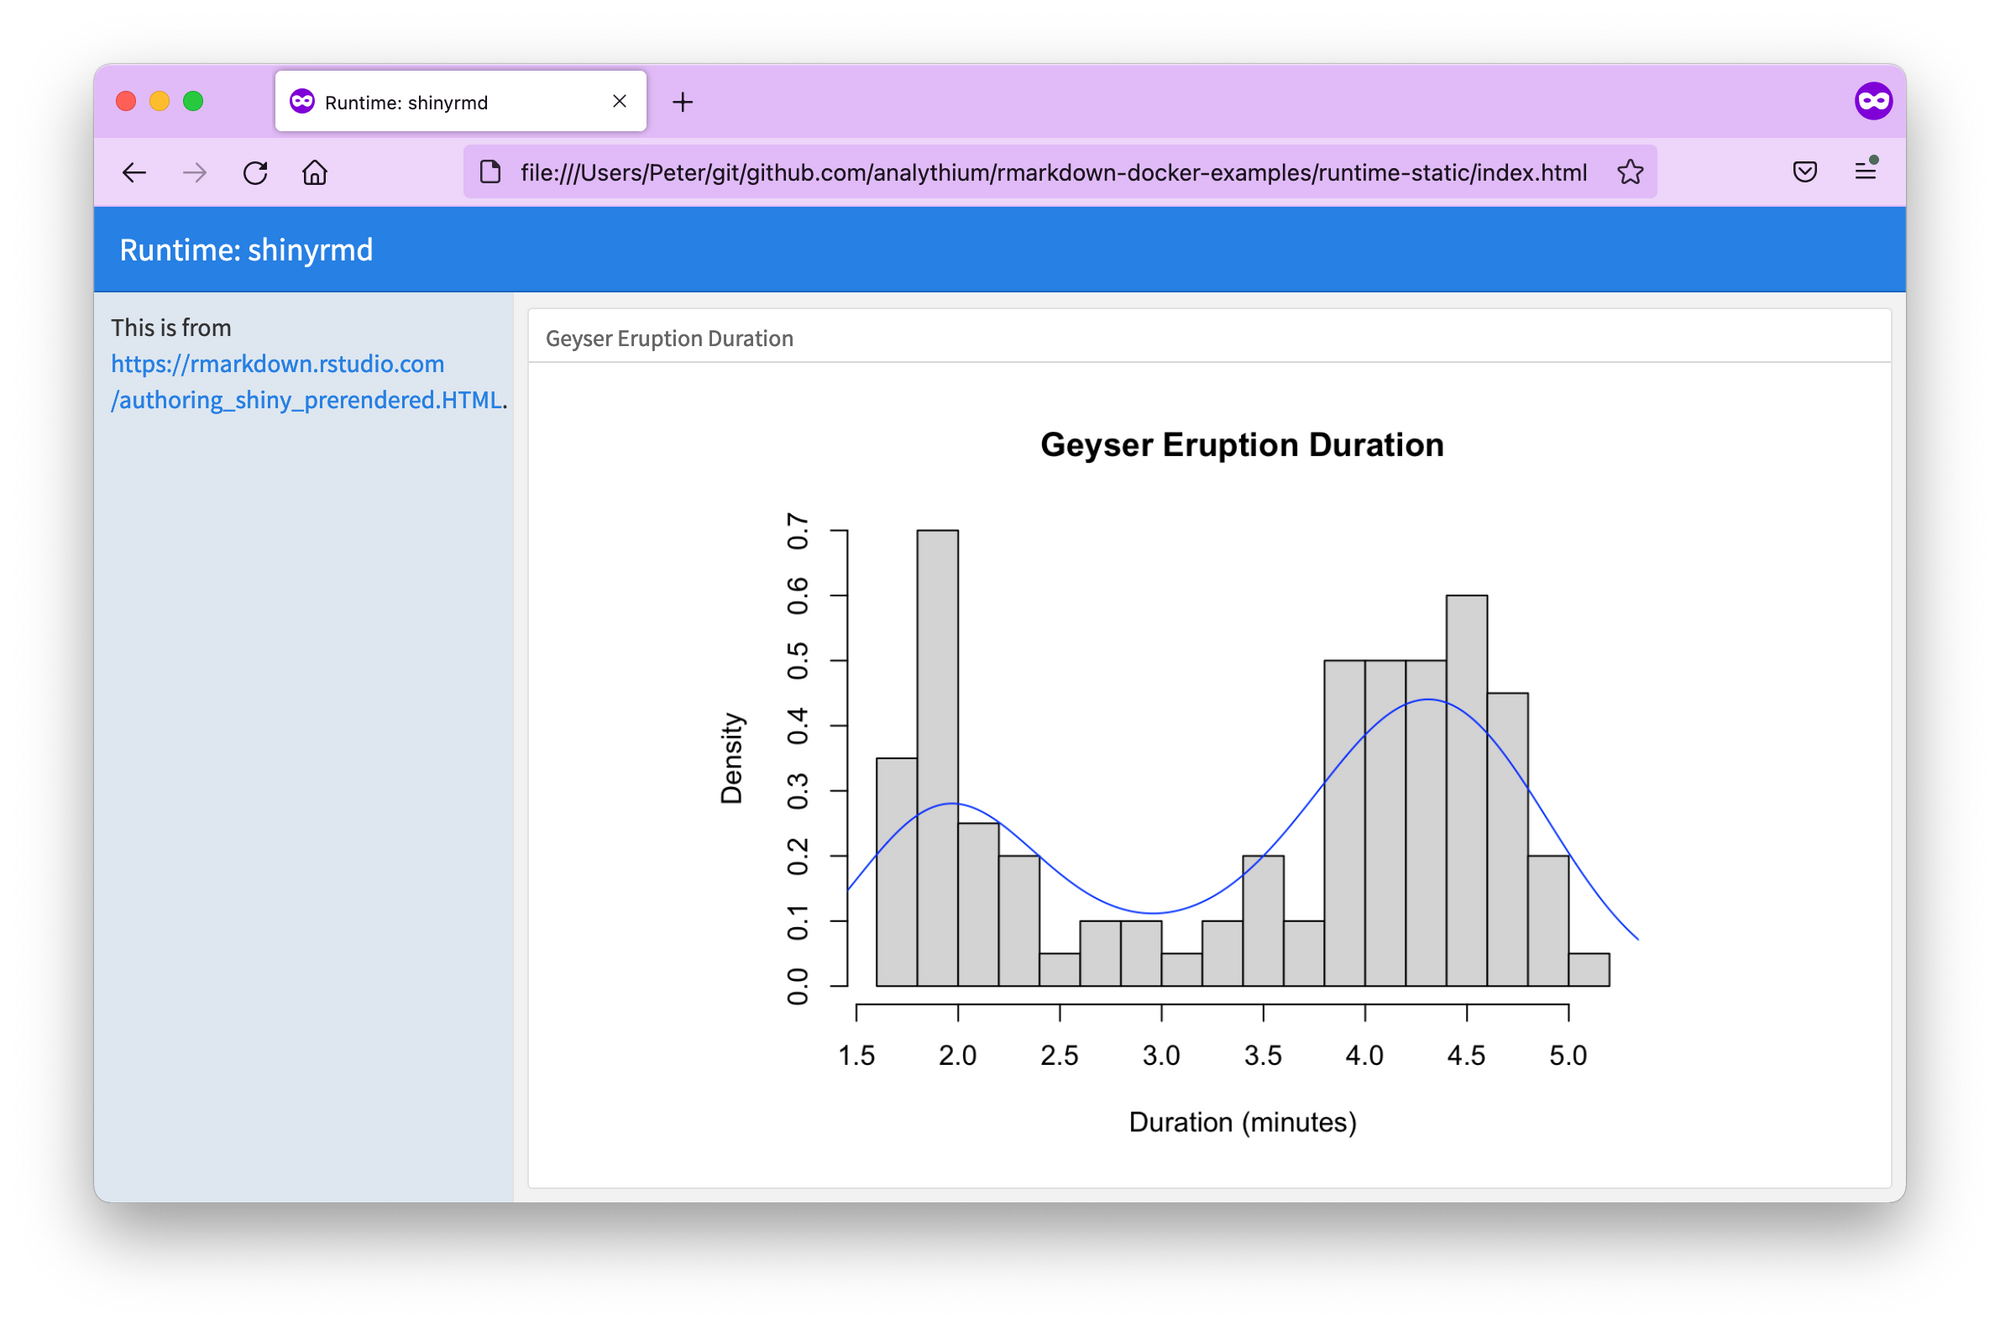
Let's see how this works for our R Markdown example. Here is the stripped-down static index.Rmd file from the runtime-static folder:
---
title: "Runtime: static"
output: flexdashboard::flex_dashboard
runtime: static
---

```{r setup, include=FALSE}
library(dplyr)
knitr::opts_chunk$set(echo = FALSE)
```

```{r data, include=FALSE}
faithful_data <- sample_n(faithful, 100)
```

Column {.sidebar}
--------------------------------------

Based on [this](...) example.

Column
-------------------------------------

### Geyser Eruption Duration

```{r}
hist(faithful_data$eruptions,
  probability = TRUE,
  breaks = 20,
  xlab = "Duration (minutes)",
  main = "Geyser Eruption Duration")
dens <- density(faithful_data$eruptions,
  adjust = 1)
lines(dens,
  col = "blue")
```
The rendered document:
Here is the 2-stage Dockerfile:
FROM eddelbuettel/r2u:20.04 AS builder
RUN apt-get update && apt-get install -y --no-install-recommends \
    pandoc \
    && rm -rf /var/lib/apt/lists/*
RUN install.r shiny rmarkdown flexdashboard dplyr
WORKDIR /root
COPY runtime-static .
RUN R -e "rmarkdown::render('index.Rmd', output_dir = 'output')"

FROM nginx:alpine
COPY --from=builder /root/output /usr/share/nginx/html
CMD ["nginx", "-g", "daemon off;"]
The 1st stage looks familiar, except we don't worry about being the root user for the build step. We name this stage builder using AS {name} after the FROM instruction.
The 2nd stage uses another FROM instruction, and we specify that we COPY from the builder stage: --from=builder. We grab all the rendered HTML and move it to the Nginx HTML folder to be served by the file server.
We just took advantage of the R build environment to render the document, and we ended up with a minimal-sized image (24.3MB) with the static content inside.
Build and run:
docker build -f Dockerfile.static -t psolymos/rmd:static .

docker run -p 8080:80 psolymos/rmd:static
Multi-stage build with the OpenFaaS Watchdog
Another option is to use the static mode of the of-watchdog from the OpenFaaS project.
The of-watchdog implements a HTTP server listening on port 8080, and acts as a reverse proxy for running functions and microservices. It can be used independently, or as the entrypoint for a container with OpenFaaS.
The 3-stage Dockerfile looks like this, including the watchdog stage that we copy the Go binary from:
FROM eddelbuettel/r2u:20.04 AS builder
RUN apt-get update && apt-get install -y --no-install-recommends \
    pandoc \
    && rm -rf /var/lib/apt/lists/*
RUN install.r shiny rmarkdown flexdashboard dplyr
WORKDIR /root
COPY runtime-static .
RUN R -e "rmarkdown::render('index.Rmd', output_dir = 'output')"

FROM ghcr.io/openfaas/of-watchdog:0.9.6 AS watchdog

FROM alpine:latest
RUN mkdir /app
COPY --from=builder /root/output /app
COPY --from=watchdog /fwatchdog .
ENV mode="static"
ENV static_path="/app"
HEALTHCHECK --interval=3s CMD [ -e /tmp/.lock ] || exit 1
CMD ["./fwatchdog"]
The last few lines are telling the of-watchdog where to serve the static files (there are other modes for dynamic/streaming data types).
Build and run the image:
docker build -f Dockerfile.static2 -t psolymos/rmd:static2 .

docker run -p 8080:8080 psolymos/rmd:static
This final image size is now down to 14.9MB. Besides the smaller size, the of-watchdog also exposes a few Prometheus metrics out of the box that can be handy for monitoring.
If you want to learn more about the of-watchdog and the OpenFaaS project, check out Alex Ellis's book Serverless for Everyone Else and the R templates for OpenFaaS.
Conclusions
The Shiny and the pre-rendered Shinyrmd runtimes for R Markdown make it possible to write interactive documents that users can interact with. This is a great way to get started with reactive programming for folks who are already familiar with R Markdown.
We can treat such interactive documents similarly to Shiny apps and deploy them using Docker containers. When it comes to static R Markdown documents, there is nothing that can prevent us from serving these from containers. We learned how to minify the Docker image using multi-stage builds.
Further reading
- R Markdown
- Shiny runtime
- Prerendered Shiny runtime
- Multi-stage builds
- Serverless for Everyone Else by Alex Ellis
- R templates for OpenFaaS