


Use Docker Compose to simplify Shiny app deployment and reach dev/prod parity. Part 1 looks at local development.
This post picks up where we left off with hosting Shiny apps with Docker run and Caddy server. There were a few shortcomings with that very basic setup: the home page looked very blunt, and managing updates to the apps was not at all streamlined.
In this post, you will learn how to use Docker Compose to simplify the management of deploying and updating multiple Shiny apps and a proxy server. We will also spend some time making the home page prettier using the Bulma CSS and the Vue JavaScript library.
What is Docker Compose
Compose is a tool for defining and running multi-container Docker applications. With Compose, you use a YAML file to configure your application’s services. Then, with a single command, you create and start all the services from your configuration. – Docker Compose documentation
This definition sums up the most important features for our Shiny app use case. We do not want to manage individual applications. Rather, we want to be able to define the whole stack in a declarative way.
You will learn the most important docker-compose concepts and commands through the example in this post. Install docker-compose following the official Docker instructions.
Project structure
Follow along this tutorial using the code in the analythium/docker-compose-shiny-example GitHub repository.
 analythium
This is the project structure: I will explain each file and folder.
.
├── docker-compose.yml
├── pink
│   ├── app
│   │   └── app.R
│   └── Dockerfile
├── site
│   ├── index.html
│   └── apps.js
├── Caddyfile
├── LICENSE
├── README.md
└── .gitignore
The Compose YAML file
The apps and their relationships are declared in a YAML file, the docker-compose.yml. YAML is a human-readable standard file format that is used extensively in cloud-native infrastructure management.
The Compose file begins with the docker-compose version information (this is optional in recent versions, but it is good practice to include). The Compose file format version 3.7 used here requires Docker Engine 18.06 or later.
This is followed by the list of services, volumes, and networks. I omitted the network part for simplicity: we will use the default bridge network that is created for the instance. Through this network, all the services will be able to access each other.
version: "3.7"

services:
  hello:
    image: registry.gitlab.com/analythium/shinyproxy-hello/hello:latest
    restart: unless-stopped
    ports:
      - "9000:3838"
  pink:
    build: ./pink
    restart: unless-stopped
    expose:
      - "3838"
  covidapp:
    image: analythium/covidapp-shiny:minimal
    restart: unless-stopped
    expose:
      - "3838"
  caddy:
    image: caddy:2.3.0-alpine
    restart: unless-stopped
    ports:
      - "80:80"
      - "443:443"
    volumes:
      - $PWD/Caddyfile:/etc/caddy/Caddyfile
      - $PWD/site:/srv
      - caddy_data:/data
      - caddy_config:/config
    depends_on:
      - hello
      - pink
      - covidapp

volumes:
  caddy_data:
  caddy_config:
The compose file translates to the following setup with services, volumes, and a default network (implicit, not stated in the file):
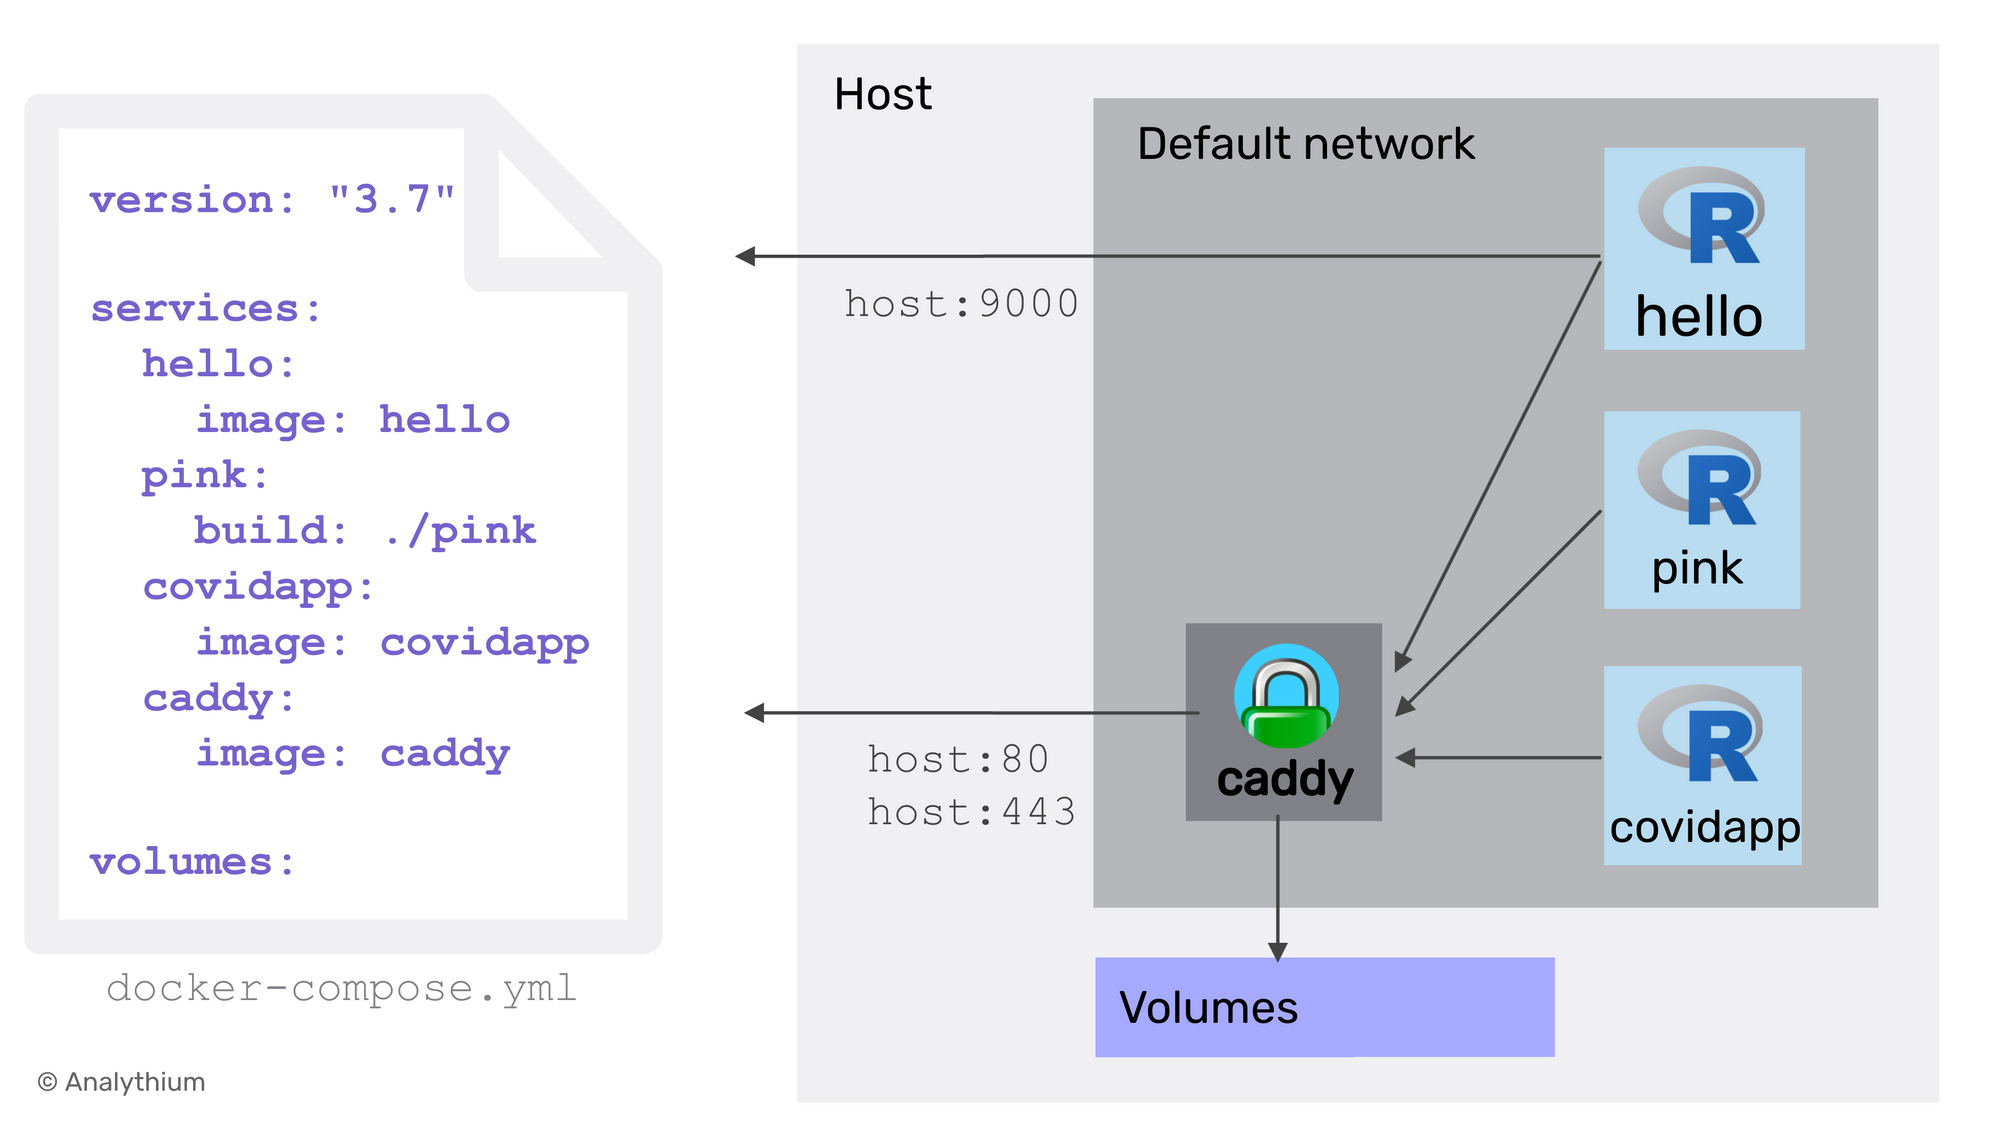
We defined three Shiny applications and the Caddy server as services. The names listed, i.e. hello, pink, covidapp, and caddy will be used as service names, this is how we can reference the different apps/services. Let's review their settings one-by-one.
#1 Hello app
Hello is a simple Shiny app introduced in one of the first posts. It draws a purple-coloured histogram of the Normal distribution. This service is defined by its image tag. The image will be pulled from the GitLab container registry. The project for the image is public, so no need to authenticate for the pull.
We define restart policy as unless-stopped that restarts the container irrespective of the exit status except when a user stops the service. We map container port 3838 to the host port 9000. This is similar to the port flag of docker run.
#2 Pink app
This Shiny app is a slightly modified version of Hello: it draws a pink-coloured histogram of a Uniform distribution. We do not have an image stored for this app. Instead, we define the build context (the ./pink folder). By default, compose will use the Dockerfile inside the build directory. See the build reference for how to provide alternative Dockerfile or additional build arguments.
Instead of ports, we have expose. This refers to the container port 3838 that is exposed to the other services inside the bridge network that Compose creates upon deployment. But the app will not be directly available over any host ports.
You can check the app source file: pink/app/app.R. The pink/Dockerfile is really simple extending the Hello app: remove the Hello app and copy the new app.R file instead.
FROM registry.gitlab.com/analythium/shinyproxy-hello/hello:latest
WORKDIR /home/app
RUN rm -rf *
COPY app .
CMD ["R", "-e", "shiny::runApp('/home/app')"]
#3 COVID-19 app
This app – introduced in this post – is defined via an image that we pull from Docker Hub (there is no alternate registry defined as part of the image tag). Restart policy is the same as for all the other services, and only the container port 3838 is exposed.
#4 Caddy server
This service is based on the official Alpine Linux-based Caddy server image. We map the HTTP (80) and HTTPS (443) ports of the container to the same ports of the host. Next, we define volumes. Volumes in the Compose file follow the source_path:target_path syntax.
To be precise, we bind mount the Caddyfile including the server configs, and the site directory with the static site content, both in the current work directory ($PWD). These mounted volumes can be changed by external processes. For example, we can change these via a git pull.
The other two volumes are created and managed by the Docker daemon and are used to store the TLS certificates and the server logs. The volumes key at the end of the file lists the volumes that will be created at the first invocation of the compose file. The two volume definitions are empty, which implies the default settings, i.e. local driver. If the volume has been created by the docker volume create command then use the external: true key-value pair in this block.
Finally, we declare the dependencies among the services. As a result, services will start (and stop) according to the dependency order.
Compose up
Before going any further, let's see what happens after issuing the docker-compose up command. Visit http://0.0.0.0 to see the landing page listing the three apps:
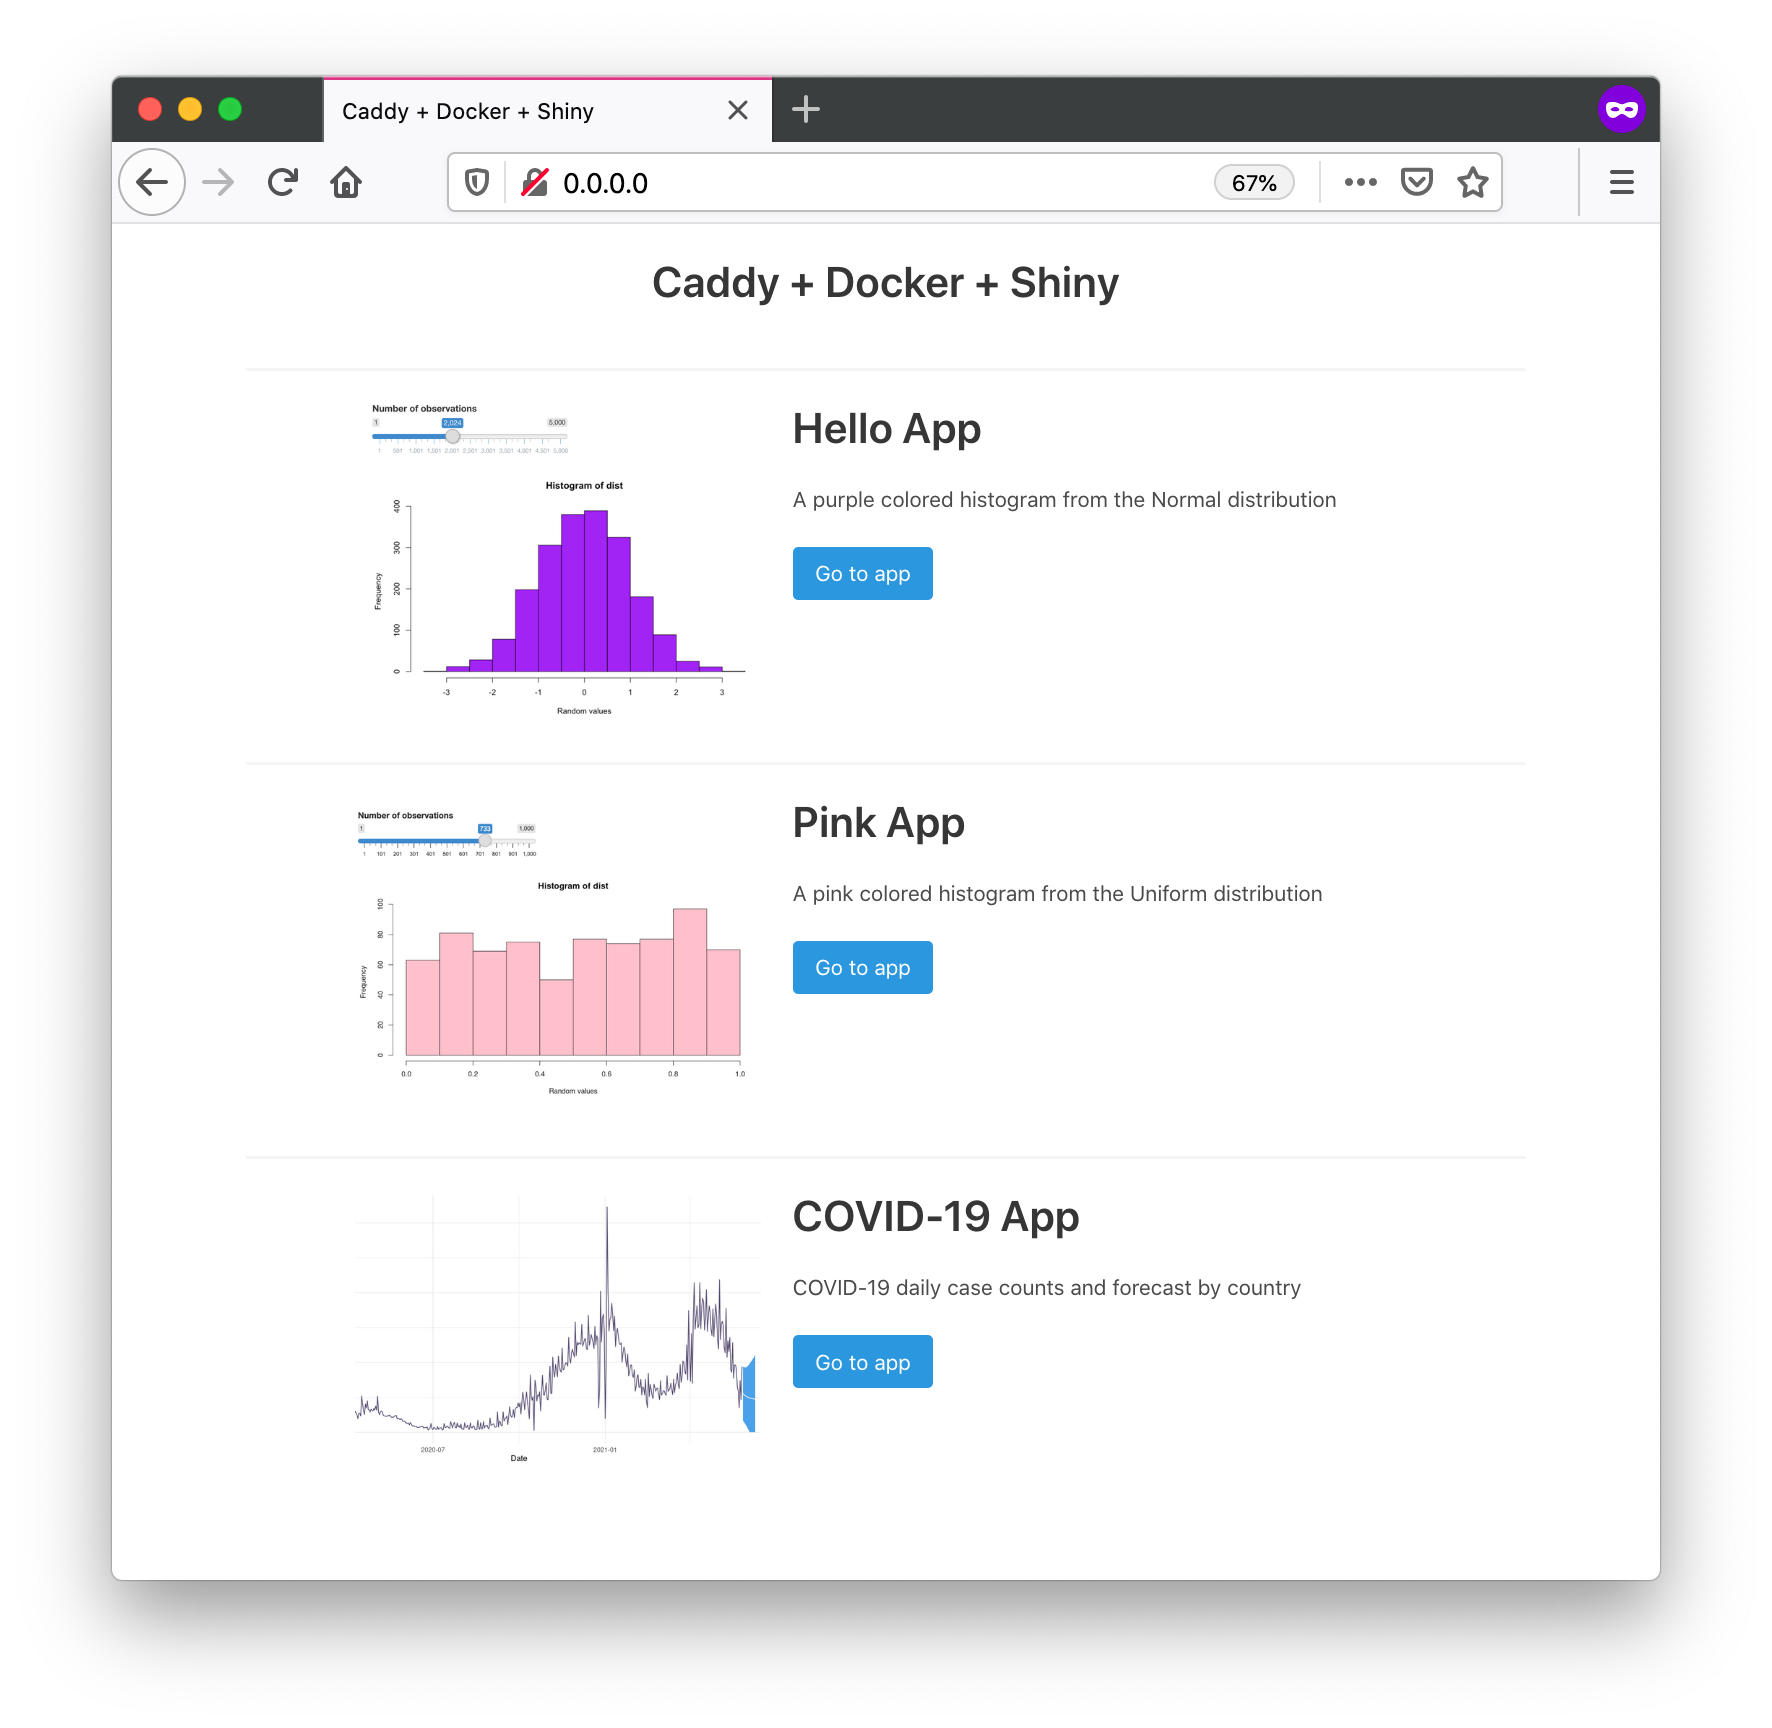
The command pulls three images and builds the image for the Pink app. It also shows a warning: Image for service pink was built because it did not already exist. To rebuild this image you must use docker-compose build or docker-compose up --build.
If you visit http://0.0.0.0:9000, you will see the Hello app: remember, the container is exposed on the host port 9000 too.
Use docker-compose up -d to start the services in the background. You can list the services that are running using docker-compose ps.
When the containers are already running, and the configuration or image was changed after the container’s creation, by default docker-compose up -d picks up the changes by stopping and recreating the containers. This feature makes it ideal for managing apps, compared to starting and stopping individual containers.
However, if you used the :latest image tag, compose will not know the difference if the image has been updated in the registry (a good reason for using versioned image tags). If this is the case, use docker-compose pull && docker-compose up -d to pull new images before the compose up.
The docker-compose down command will stop containers and removes containers, networks, volumes, and images created by up.
The Caddyfile
The Caddyfile defines the server setup: we reverse proxy the Shiny apps to their respective paths. Note that we reference the services by their aliases. The file server is served from the srv folder, this mounted from the site folder of our git project. I also included a simple error handling to show a page not found (404) status message:
:80 {
    root * /srv
    handle_path /hello/* {
        reverse_proxy hello:3838
    }
    handle_path /pink/* {
        reverse_proxy pink:3838
    }
    handle_path /covidapp/* {
        reverse_proxy covidapp:3838
    }
    file_server
}
The server is running on port 80 without the protocol and domain name defined (that is why we used 0.0.0.0 in the browser which is the same as 0.0.0.0:80). When running in production, you have to add an IP address or a domain name instead.
File server
The index.html file in the site folder is the landing page. The file uses the responsive Bulma CSS library that requires no JavaScript. I picked a template and modified it for this landing page.
The index.html file loads the Vue JavaScript library using a content delivery network (CDN). This means we don't need build tools (like yarn or npm) to compile the app, it can be included directly in our HTML file. The important part looks like this (simplified):
<div id="app">
    <div  v-for="i in apps">
        <img v-bind:src="i.image">
        <h1 class="title">{{ i.name }}</h1>
        <p>{{ i.description }}</p>
        <a v-bind:href="i.path" class="button is-info">
            Go to app
        </a>
    </div>
</div>
We have a v-for loop that takes elements (i) from the apps array. Each element has properties that define the thumbnail image, the app name, description. These use text interpolation following the “Mustache” syntax. The v-bind directive binds the path property to the href attribute of the anchor <a> tag, styled as a button.
The apps array is defined in the site/apps.js file as follows:
var apps = [
    {
        name: "Hello App",
        path: "./hello/",
        image: "https://hub.analythium.io/img/shiny/shiny-hello.png",
        description: "A purple colored histogram from the Normal distribution"
    },
    {
        name: "Pink App",
        path: "./pink/",
        image: "https://hub.analythium.io/assets/web/pink-hist.png",
        description: "A pink colored histogram from the Uniform distribution"
    },
    {
        name: "COVID-19 App",
        path: "./covidapp/",
        image: "https://hub.analythium.io/assets/web/covid-shiny.png",
        description: "COVID-19 daily case counts and forecast by country"
    }
]

var app = new Vue({
    el: '#app',
    data: {
        apps: apps
    }
})
At the end of the file, we have the new Vue instance defined, bound to the HTML element called app (find the <div id="app"> in the HTML file).
Summary
Congratulations, you have managed to put together a powerful application bundle. That shows some serious DevOps superpowers. But this was only the local development side of the workflow. In Part 2, we will look at how to push the contents of the git repository into production.
Further reading
- Docker Compose documentation
- Compose file documentation
- Compose chapter from the Docker Handbook
- Bulma templates