


Use Docker Compose to simplify Shiny app deployment and reach dev/prod parity. Part 2 looks at production.
In Part 1 you learnt how to define multiple Shiny applications in a Docker compose YAML file and how to spin up the services on your local machine. In Part 2 you'll see how to deploy to a virtual machine using git and Docker compose.
As before, you can follow this tutorial using the code in the analythium/docker-compose-shiny-example GitHub repository.
 analythium
Server setup
Create a virtual machine with Ubuntu Linux 20.04 operating system image, set up an A record pointing to the machine's internet protocol (IPv4) address for your custom domain or subdomain. I use docker-compose.analythium.net, change it to your domain. Having the domain set up is important for serving the apps over HTTPS: the transport layer security (TLS) certificate requires a custom domain.
Log in with ssh. Once inside the server, update/upgrade and install Docker & Docker Compose. Enable the Docker service to restart when the system boots. You can use the domain name or the IPv4 address here:
export HOST="docker-compose.analythium.net"
ssh root@$HOST

apt-get -y update
apt-get -y upgrade

apt-get install -y \
    docker \
    docker-compose

systemctl enable docker
Project setup
Pull the GitHub repository contents and cd into repository:
git clone https://github.com/analythium/docker-compose-shiny-example.git
cd docker-compose-shiny-example
Edit the docker-compose.yml file and add your email to the line that defines EMAIL="your.name@yourdomain.com" for the Caddy service as an environment variable. Adding the email is recommended, because some of the security challenges require an email, and it is also used to send you notifications about expiring certificates, etc.
The other edit you have to make for the production server is to change the HOST environment variable in the docker-compose-prod.yml file:
version: "3.7"

services:
  caddy:
    environment:
      - HOST="example.com"
The Caddyfile will be parsed to have these two environment variables substituted in production:
{
    email your.name@yourdomain.com
}

yourdomain.com {
...
}
Whereas the parsed file will look like this in development:
{
    email your.name@yourdomain.com
}

:80 {
...
}
Obviously, such changes would already be part of your git repository, edits are necessary for this tutorial for tailoring the contents to your particular settings.
Compose up in production
You used docker-compose up -d in development which started the services defined in the docker-compose.yml file. Docker-compose offers a way to override the compose YAML settings.
The restart policy in the YAML is set to always for all the services, this ensures that they will be started automatically after a reboot.
Apply the overrides in production as:
docker-compose \
  -f docker-compose.yml \
  -f docker-compose-prod.yml \
  up -d
You should see something like this:
Creating network "docker-compose-shiny-example_default" with the default driver
Creating docker-compose-shiny-example_hello_1 ... done
Creating docker-compose-shiny-example_covidapp_1 ... done
Creating docker-compose-shiny-example_pink_1 ... done
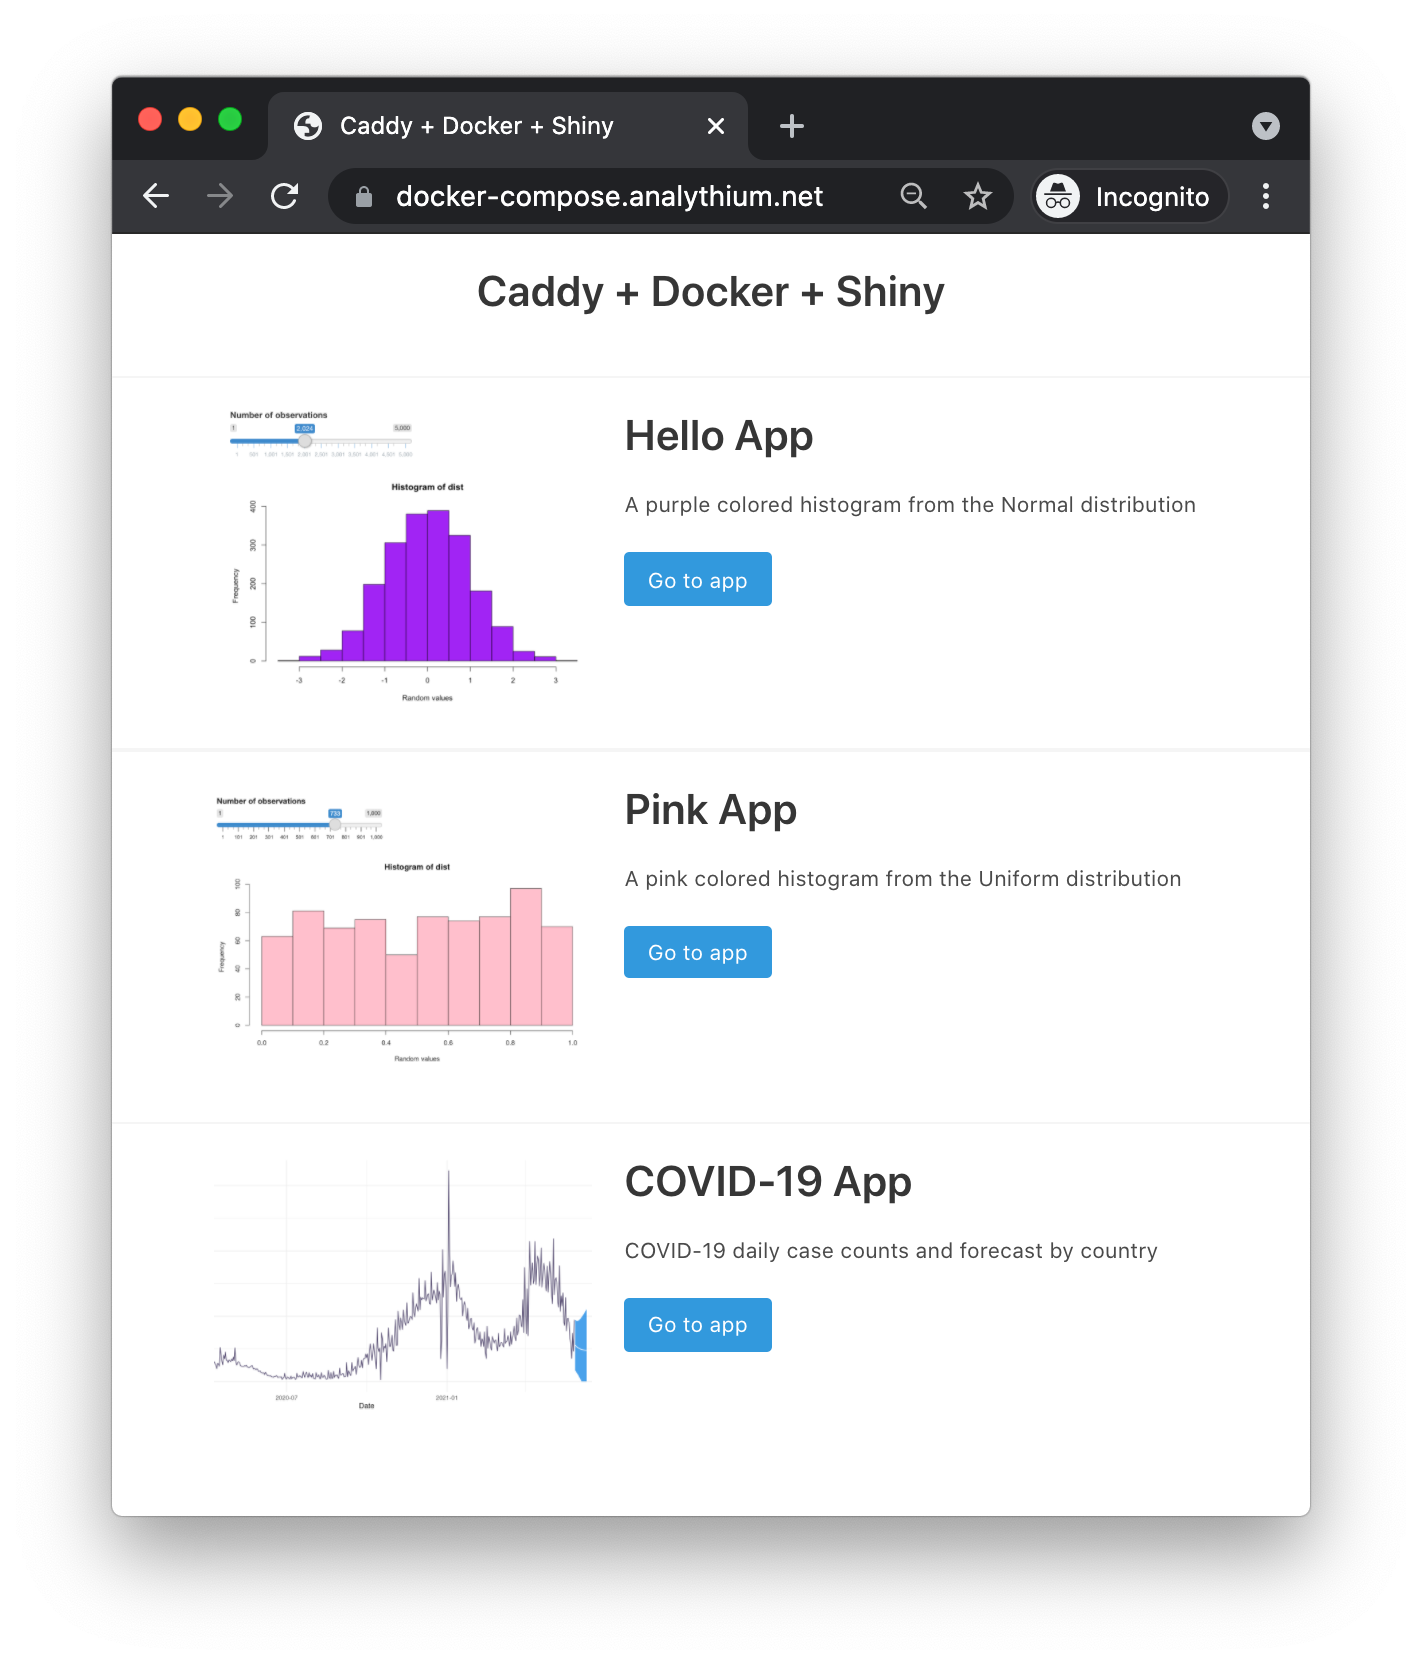
Creating docker-compose-shiny-example_caddy_1 ... doneVisit https://$HOST to see the website, see the lock icon indicating HTTPS:
Logging
Check the logs with docker-compose logs or docker-compose logs <service_name>.
Go to https://$HOST and visit some of the apps in your browser to generate some traffic to the apps. Now check the log/access.log file on the server. This is where the $HOST site's logs are written. The logs are well structured, each line is a JSON object and can be consumed by other scripts:
{
  "level":"info",
  "ts":1623739066.8059502,
  "logger":"http.log.access.log0",
  "msg":"handled request","request":{
    "remote_addr":"68.148.56.231:51510",
    "proto":"HTTP/2.0",
    "method":"GET",
    "host":"docker-compose.analythium.net",
    "uri":"/",
    "headers":{
      "Accept-Language":["en-US,en;q=0.9"],
      "Sec-Ch-Ua":["\" Not;A Brand\";v=\"99\", \"Google Chrome\";v=\"91\", \"Chromium\";v=\"91\""],"Sec-Ch-Ua-Mobile":["?0"],
      "User-Agent":["Mozilla/5.0 (Macintosh; Intel Mac OS X 10_15_7) AppleWebKit/537.36 (KHTML, like Gecko) Chrome/91.0.4472.101 Safari/537.36"],
      "Sec-Fetch-User":["?1"],
      "Sec-Fetch-Mode":["navigate"],
      "Sec-Fetch-Dest":["document"],
      "Accept-Encoding":["gzip, deflate, br"],
      "Cache-Control":["max-age=0"],
      "Upgrade-Insecure-Requests":["1"],
      "Accept":["text/html,application/xhtml+xml,application/xml;q=0.9,image/avif,image/webp,image/apng,*/*;q=0.8,application/signed-exchange;v=b3;q=0.9"],"Sec-Fetch-Site":["none"]
    },
    "tls":{
      "resumed":false,
      "version":772,
      "cipher_suite":4865,
      "proto":"h2",
      "proto_mutual":true,
      "server_name":"docker-compose.analythium.net"
    }
  },
  "common_log":"68.148.56.231 - - [15/Jun/2021:06:37:46 +0000] \"GET / HTTP/2.0\" 200 1333",
  "duration":0.007172668,
  "size":1333,
  "status":200,
  "resp_headers":{
    "Server":["Caddy"],
    "Etag":["\"quqbzp111\""],
    "Content-Type":["text/html; charset=utf-8"],
    "Last-Modified":["Tue, 15 Jun 2021 06:14:13 GMT"],
    "Accept-Ranges":["bytes"],"Content-Length":["1333"]
  }
}
Logs are written to the file with log rolling, which is enabled by default. Roll size is 100 MB and there will be log files to keep before deleting the oldest ones, logs are kept for 90 days by default.
You can use the logs to check issues (level is warning or error), and also to see usage for the different URI's (see the "uri":"/" part). The GitHub repository has an R project file inside the log directory. Start that R project in RStudio on your local machine and open the index.R file:
HOST <- "159.203.22.73" # your IP or HOST name here

system2("scp",
  c(
    sprintf(
      "root@%s:/root/docker-compose-shiny-example/log/access.log",
      HOST
    ),
    "access.log"
  )
)


x <- lapply(
  readLines("access.log"),
  jsonlite::fromJSON)

## timestamp
ts <- as.POSIXct(sapply(x, "[[", "ts"), origin = "1970-01-01")
## URI
uri <- sapply(x, function(z) z$request$uri)

## find bare URIs
s <- endsWith(req_uri, "/") & !endsWith(req_uri, "/websocket/")

table(req_uri[s], as.Date(ts[s]))

#              2021-06-15 2021-06-16
#  /                    8          2
#  /covidapp/           3          0
#  /hello/              5          0
#  /pink/               5          1
The script runs the following command to copy over the access.log file from the server using scp: scp root@$HOST:/root/docker-compose-shiny-example/log/access.log $PWD/log/access.log. It uses system2() for that. Next we read in the logs with readLines() and JSON-ify each line using the fromJSON() function from the jsonlite R package.
After some data wrangling, we get the number of times the endpoints were visited by date. A bit more wrangling can show the unique visits by date, i.e. by using the request$remote_addr values to exclude duplicates.
Update services and configs
If you change the image tags, the files in the build context directory, or any settings in the compose YAML files, compose will puck up the changes and restart the services accordingly.
Remember that if you used the :latest image tag, compose will not know the difference if the image has been updated in the registry. You'll have to use docker-compose pull before compose up to pull new images.
If you decide to add new apps, these are the steps to do on your local machine:
- add new service to the compose YAML file (build context or image tag)
- add a reverse proxy definition in the
Caddyfileusing thehandle_pathdirective - add image, name, description, path (matching the Caddy config) to the
appsarray in thesite/apps.jsfile - commit and push changes to the git remote using
- push Docker images to the Docker registry
Here are the steps on the host machine:
sshingit pullto have all the updates to the build folders and configurationsdocker-compose pullto pull the latest imagesdocker-compose -f docker-compose.yml -f docker-compose-prod.ymlas before
up -d
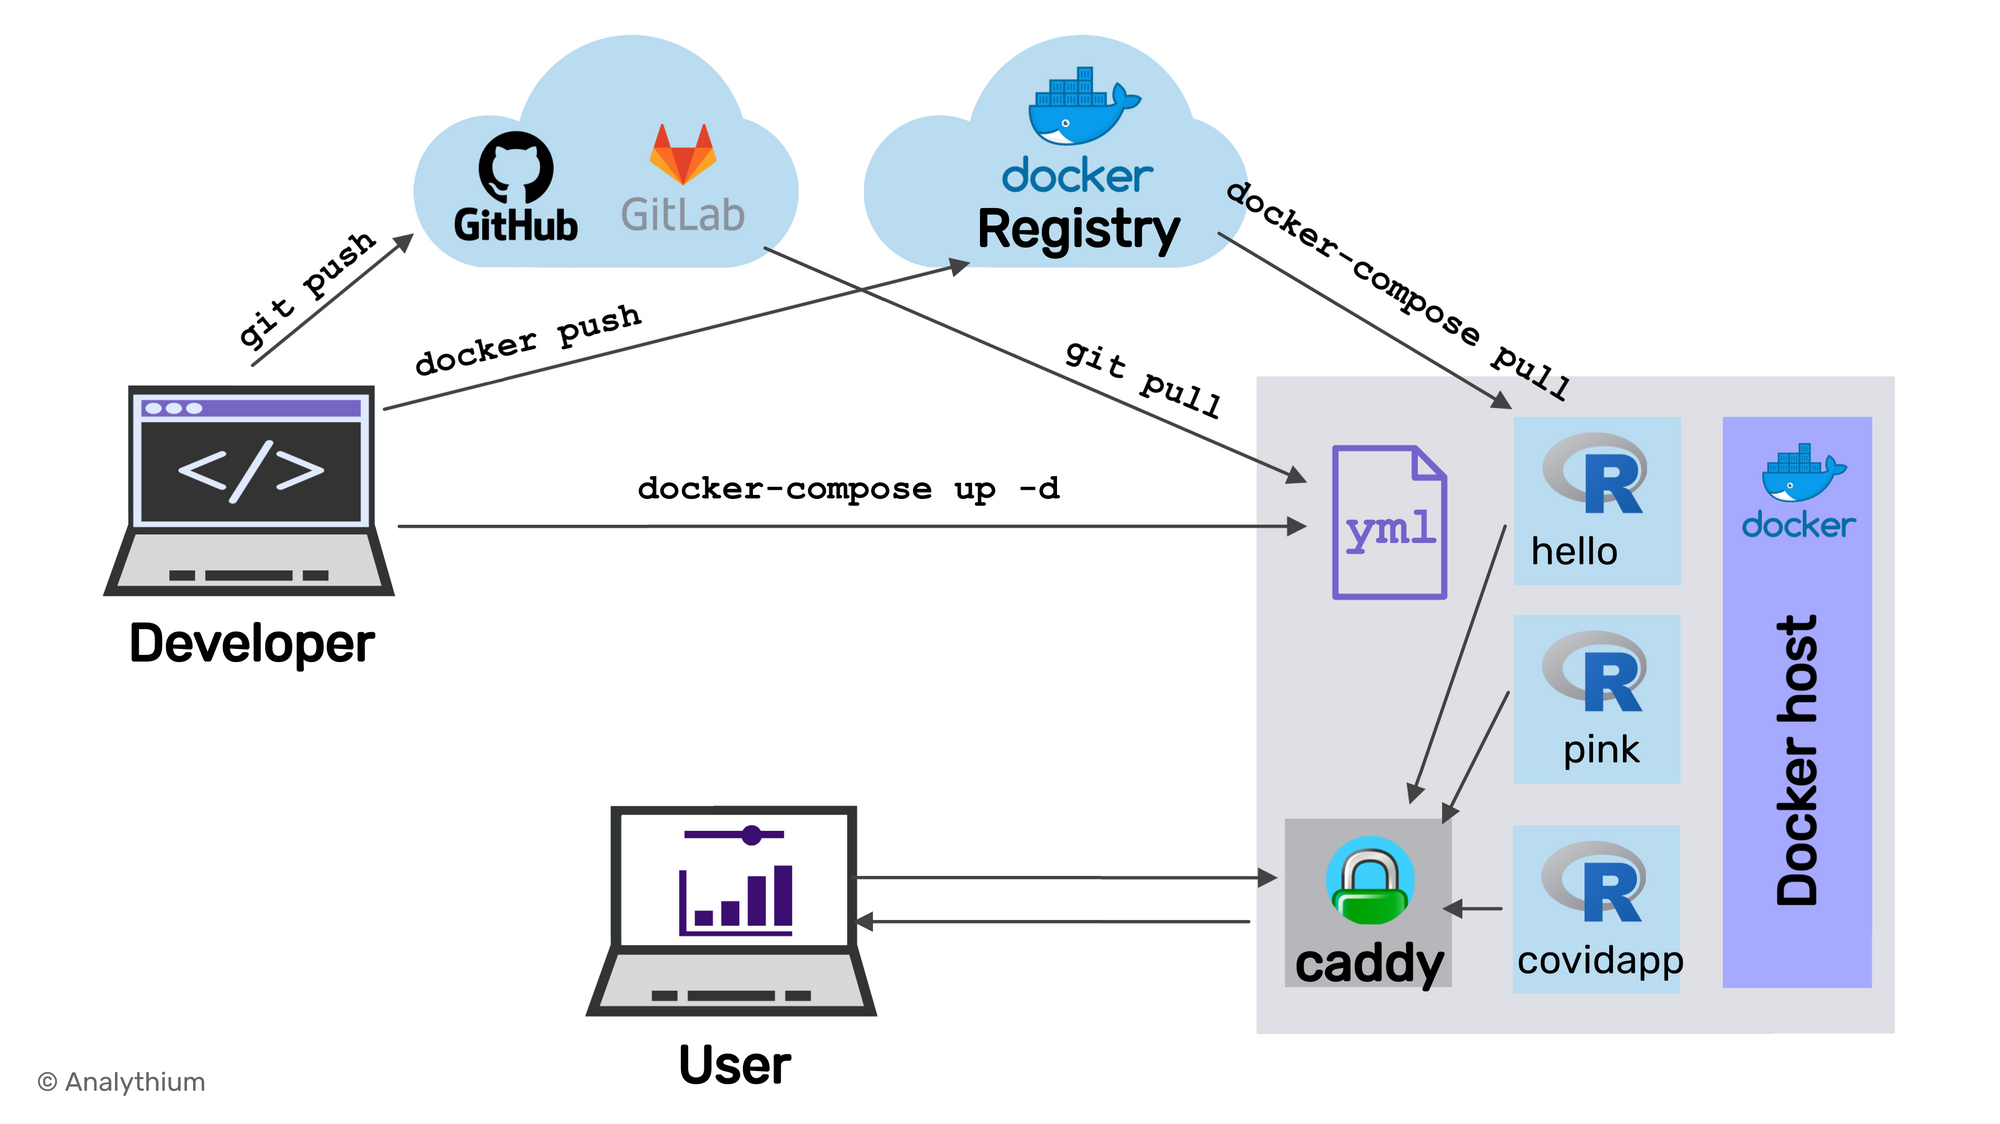
As illustrated in the diagram:
Note that the Caddy server service currently uses internal named volumes for the data directory and the configuration directory. According to the docs: "Caddy stores TLS certificates, private keys, OCSP staples, and other necessary information to the data directory". If these need to be persisted between Docker compose ups and downs, you might want to create external named volumes with i.e. docker volume create caddy_data and docker volume create caddy_config, then specify these in the docker-compose.yml as follows:
...
volumes:
  caddy_data:
    external: true
  caddy_config:
    external: true
This will not be torn down with docker-compose down, only when using docker volume rm <volume_name>.
Summary
The Docker Compose setup is well suited for smaller sites: HTTPS and custom domains with detailed access logs. Compose does most of the heavy lifting for internal networking. Therefore, modifications are really straightforward.
When the containers are already running, and the configuration or images have changed after the container’s creation, docker-compose up picks up the changes by stopping and recreating the containers. This feature makes it ideal for managing apps, compared to starting and stopping individual containers.
The git-based deployment ensures dev/prod parity, which means that your development environment is as similar to the production environment as possible. We controlled the dev/prod environments with environment variables and Docker compose YAML file overrides.
Further reading
- Docker Compose tutorial
- The official Caddy image on Docker Hub
- More on the logging directive for Caddy